This dish soap dispenser was an easy little craft for a Sunday afternoon. I’ve never had it together enough to put my soap away when I’m done with it. Plus, my guys are ‘wash your hands in the kitchen sink with dish soap’ guys. Seriously, it drives me nuts! They act like it’s the only sink in the house!
Even for myself I’ve sometimes wished for a soap dispenser at the kitchen sink. Maybe something a little prettier than the dish detergent bottle too. I was talking about it the other night, and my youngest pointed out the empty body wash bottled kicking around in the bathroom.
It’s almost exactly the same size as the dish soap bottle.
So I grabbed another piece of fabric from my stash and cut it into squares (one of these days I’m going to get some left-handed pinking shears) and started decoupaging.
I started from the bottom, clipping the fabric to fit around the curves.
I used white glue mixed 1:1 with water, and just kept working my way up to the top of the bottle.
After masking off the threads for the lid, I gave it all three good coats of acrylic sealer. I also painted the pump gold.
No more Sunlight bottle on the counter!
If you enjoyed this post, don’t forget to share it with your friends! For more just like it, follow me on Pinterest, Facebook and Twitter or sign up for regular updates by email.
If you have ever thought about starting a garden or craft blog of your own see how easy it is>>here<<.
I am so happy with the way these 3 little frogs from the dollar store came out. I wanted to try fabric mache but didn’t feel up to making a form and all of that, so I bought 3 clay frogs from the dollar store for $2.50 each.
The fabric is from one of those fat quarter bundles and the colors suitably froggy. As for the frogs? Well let’s just say mass production and the rustic aged look don’t go together.
Covered in these gross warty spots and indifferently aged and scuffed.
I sanded off the worst of their sins, and going by how easy it was I’m going to assume these guys aren’t weather proof.
They all got slathered in a coat of white paint so I wouldn’t have to worry about any show-through with the lighter fabrics.
While the paint was drying, I cut the fabric into strips. Pieces 1″ by 2″ worked well for me with the occasional smaller bits for around the eyes and toes.
I used one of the geometric prints as the throat – in hindsight I might have chosen differently. I just used 1 part white glue to 1 part water and a paintbrush to apply it.
The green speckled is may favorite of the three, but all of them turned out surprisingly well. I was expecting a wrestling match to get the fabric and glue to behave but it all went together easy peasy.
The olive one looks nice too, I’m still a bit iffy on the mint green one.
If I were doing it again, I would have just done the entire frog in the same fabric.
Patterned napkins would have worked too, but I already had the fabric. All they need now is a coat of spray sealer and done.
Materials needed for this project:
White glue mixed 1:1 with water
fabric or paper strips
a paint brush
dollar store critter in need of a makeover
Someday I would love to try this technique on one of those homely little plastic turtle planters, I bet it would look great. What do you think?
If you enjoyed this post, don’t forget to share it with your friends! For more just like it, follow me on Pinterest, Facebook and Twitter or sign up for regular updates by email.
If you have ever thought about starting a garden or craft blog of your own see how easy it is>>here<<.
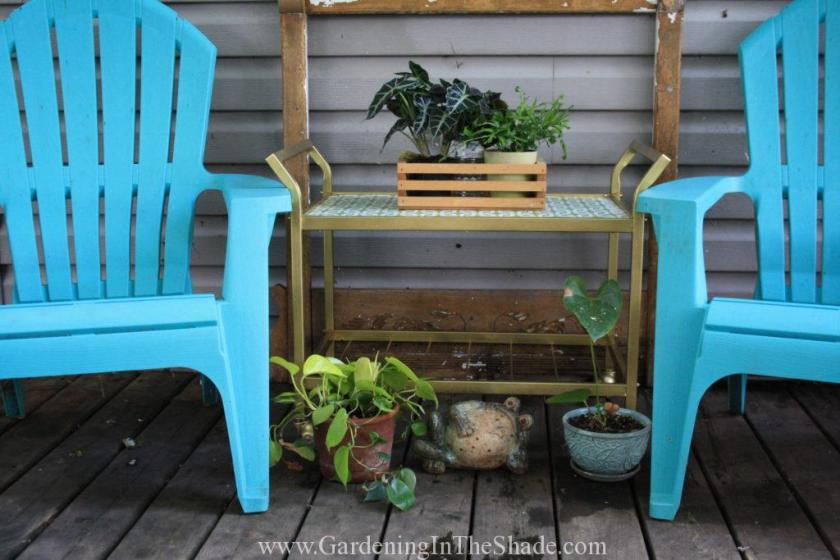
My current deck furniture situation is okay when it’s just me sitting out there, but there is a shortage of surfaces capable of holding a drink. A situation that gets awkward quickly when I sit out there with my friends. So Saturday I made a trip to Picker’s Pig Pen to see if I could find anything that would work. Well wait until you see how great this TV stand looks after I got done with it.
I found this great old rusty TV cart on Saturday and a melamine TV Tray. My oldest boy gave them his ‘that’s disgusting’ lip curl.
This is what I started with, an old TV cart that was probably from the 70’s. I always have a hard time picking the right decade, because we kept stuff forever in my family. It had the walnut colored fake wood grain mactac, and the shelves were masonite imitating walnut. But as rusty as it was, it was solid, more solid than any thing I’ve bought new lately.
So I grabbed a bucket of hot water and Mr. Clean and scoured away as much of the rust as I could. Then I spray-painted the metal – fake wood-grain stickers and all – with antique gold spray paint. I am pretty hit and miss when it comes to my spray painting skills, but this time I nailed it. Honestly I kept staring at that frame all night.
But I still had to do something about the ‘walnut’ shelves. One was too warped to use, but I spray-painted the other one in a color to match my plastic Adirondack chairs – Rustoleum ‘Aqua’.
It did not look good with the gold-colored frame at all!
I had seen an article where someone decoupaged a table top and it looked awesome. So I dug through my fabric stash, and tried Mod Podge for the first time in my life. Because it was my first time using it, there are no step by step pictures for this one. I had a hard time just keeping up with how quickly the Mod Podge was drying in the heat, but the link above will take you to some pretty clear instructions. I sprayed it with a Matte finish sealer once it was dry so we will see how well it holds up to the weather.
Check out my new Tea Table!
There’s plenty of room for a tray of tea things now, even with my plants on there!
A bottom shelf for tucking away anything I’ve piled beside my chair when company comes.
I really need to decide if I’m going to keep the mirror frame on the deck. It looked fabulous when it still had chippy white paint on it, but all the chippy paint has chipped away to nothing.
You can still see the fake wood grain if you look closely.
I just love this happy bright apple-green fabric.
The melamine TV tray from the 90’s in the first picture is coming up this week, and trust me it was a DIY that started out so flipping awesome until everything, and I mean everything including random bird poop, started to go wrong.
If you enjoyed this post, don’t forget to share it with your friends! For more just like it follow me on Pinterest, Facebook and Twitter or sign up for regular updates by email.
If you have ever thought about starting a garden or craft blog of your own see how easy it is>>here<<.
This website uses cookies so that we can provide you with the best user experience possible. Cookie information is stored in your browser and performs functions such as recognising you when you return to our website and helping our team to understand which sections of the website you find most interesting and useful.
Strictly Necessary Cookies
Strictly Necessary Cookie should be enabled at all times so that we can save your preferences for cookie settings.
If you disable this cookie, we will not be able to save your preferences. This means that every time you visit this website you will need to enable or disable cookies again.